Friday, November 30, 2007

useful links of free stuff on the net to get up and running with asp.net and sql server 2005.

http://www.asp.net/community/projects/
asp.net 2.0 starter kit, with full source code, to get up to speed quickly at work, or startup a business

http://ajax.asp.net/toolkit  
the Microsoft ajax control toolkit

http://ajax.asp.net 
all about Microsoft implementation AJAX

http://ajaxload.info/
generate and download loading... GIF animations without hastle, and without imageready.

http://www.w3schools.com
great for beginners for html, xml, css, javascript, asp.net etc... works for intermediate level also (great site)

http://www.databaseanswers.com
great starter kit database designs for almost any business need (over 200 data models)

http://msdn2.microsoft.com/express/bb403186.aspx  
starter database schemas for sql server 2005

http://www.asp.net/learn/ 
many free .net videos for asp.net, sql server 2005, and visual studio needs

Enjoy!

Comments are welcome.

asp.net 2.0 Security: a role management module in C#

instead of everytime developing the code to manage roles in the aspnetdb database, it is just as easy to put all the logic and code inside a user control. the control has one property, which is the UserName, once we have the username, we can add that user to a role, or to many roles, as well as removing the user from different roles.

in a few screenshots and code, I hope this article will help getting up to speed with asp.net 2.0 roles management.

here's a screen shot of the screen :

bct-129
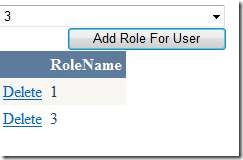
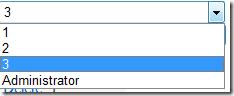
in this case we use numbers for roles 1, 2, 3 and Administrator

image
1. Code for binding the combobox

public void BindAllRoles()
{
this.DropDownList1.DataSource = Roles.GetAllRoles();
this.DropDownList1.DataBind();
}


2. Code for Binding the Grid: the grid only contains the roles the use is in.


public class BearCatRoles
{
private string mRoleName;

public string RoleName
{
get { return mRoleName; }
set { mRoleName = value; }
}

}


public void BindRolesForUser()
{
string[] roleslist = Roles.GetRolesForUser("the user name goes here");
int i = 0;
BearCatRoles br;
List<BearCatRoles> lstbr = new List<BearCatRoles>();

foreach (string brole in roleslist)
{
br = new BearCatRoles();
br.RoleName = brole;
lstbr.Add(br);
}
this.GridView1.DataSource = lstbr;
this.GridView1.DataBind();

}


in The code above:


we have a class called BearCatRoles (BearCat is a specific entity,
to not confuse it with roles. the class is used to bind the grid
to a Generic list List<BearCatRoles>
for the BindRolesForUser() function :
1. we get the roles list for the speicific user
2. we loop through the array of roles, and fill a list of the BearCatRoles Class, then bind our grid.
3. What is necessary is to decide where to bring the userName from.
For the button's click event, here's the code:


if (Roles.FindUsersInRole(this.DropDownList1.SelectedItem.Text, "user name goes herer").Length == 0)
Roles.AddUserToRole(this.HiddenField1.Value, this.DropDownList1.SelectedItem.Text);
BindRolesForUser();


For the gridview's delete command, here's the code:


protected void GridView1_RowCommand(object sender, GridViewCommandEventArgs e)
{
if (e.CommandName == "Delete")
{
Roles.RemoveUserFromRole(this.HiddenField1.Value, e.CommandArgument.ToString());
BindRolesForUser();
}
}


Most important Lines in this module:


if (Roles.FindUsersInRole(this.DropDownList1.SelectedItem.Text, "user name goes herer").Length == 0)
Roles.AddUserToRole(this.HiddenField1.Value, this.DropDownList1.SelectedItem.Text);


Roles.RemoveUserFromRole(this.HiddenField1.Value, e.CommandArgument.ToString());


string[] roleslist = Roles.GetRolesForUser("the user name goes here");


this.DropDownList1.DataSource = Roles.GetAllRoles();


Here's the markup:


<asp:DropDownList ID="DropDownList1" runat="server" Width="226px">
</asp:DropDownList>
<asp:Button ID="Button1" runat="server" OnClick="Button1_Click" Text="Add Role For User" />
<asp:GridView ID="GridView1" runat="server" CellPadding="4" ForeColor="#333333" GridLines="None"
OnRowCommand="GridView1_RowCommand" OnSelectedIndexChanged="GridView1_SelectedIndexChanged"
OnRowDeleting="GridView1_RowDeleting">
<Columns>
<asp:TemplateField>
<ItemTemplate>
<asp:LinkButton ID="LinkButton1" CommandName="Delete" CommandArgument='<%# Eval("RoleName") %>'
runat="server">Delete</asp:LinkButton>
</ItemTemplate>
</asp:TemplateField>
</Columns>
<FooterStyle BackColor="#5D7B9D" Font-Bold="True" ForeColor="White" />
<RowStyle BackColor="#F7F6F3" ForeColor="#333333" />
<PagerStyle BackColor="#284775" ForeColor="White" HorizontalAlign="Center" />
<SelectedRowStyle BackColor="#E2DED6" Font-Bold="True" ForeColor="#333333" />
<HeaderStyle BackColor="#5D7B9D" Font-Bold="True" ForeColor="White" />
<EditRowStyle BackColor="#999999" />
<AlternatingRowStyle BackColor="White" ForeColor="#284775" />
</asp:GridView>


and Finally: in the web.config, concerning the roles, the following need to be defined:


<roleManager enabled="true" />


Comments are always welcome

Monday, November 26, 2007

An easy and clean way to use ajax tab container, tab panels, and user controls, to make a great multi-tab form

Setting up the navigation and user Interface

say we have a form, with asp.net 2.0. we need to allow the user to enter his 1. personnal information, 2. Professional information, 3. Contact Information, and finally, his 4. professional experience in the form of a list.

asp.net 2.0 ajax 1.0 C# user controls properties

I. first we start by setting up the ajax tabs, to follow the pattern we set above.

<ajaxToolkit:TabContainer ID="tbCandidate" runat="server" ActiveTabIndex="0">
<ajaxToolkit:TabPanel ID="step1" runat="server" HeaderText="Personnal Information">
<ContentTemplate>
</ContentTemplate>
</ajaxToolkit:TabPanel>
<ajaxToolkit:TabPanel ID="TabPanel1" runat="server" HeaderText="Professional Information">
<ContentTemplate>
</ContentTemplate>
</ajaxToolkit:TabPanel>
<ajaxToolkit:TabPanel ID="TabPanel2" runat="server" HeaderText="Contact Information">
<ContentTemplate>
</ContentTemplate>
</ajaxToolkit:TabPanel>
<ajaxToolkit:TabPanel ID="TabPanel3" runat="server" HeaderText="Professional Experience">
<ContentTemplate>
</ContentTemplate>
<HeaderTemplate>
Experience
</HeaderTemplate>
</ajaxToolkit:TabPanel>
</ajaxToolkit:TabContainer>


image


II. Now, let's create a user controls for each step, this will help us organize our tabs content, as well as keep code somewhat clean and organized.


image


The 4 user controls above are empty. we will place each one in its own tab. for the DataEntryControls folder, we will look at it later on.


image


III. Next, we will start by putting up the controls inside the user controls, which will set up our data entry screens. (for the sake of simplicity, we will have reduced Number of fields, 2 to 3 by user control, by tab).

Personnal Information :


image

Friday, November 23, 2007

A great site for starter kit databases :

Database answers , it's a company which has chosen to offer, online, over 200 database schemas (mostly proven and applied in production) on the net.

to go directly to the schemas, here's the link: Free Database Models Page .

I personnally have used two schemas for stock management and invoicing, and it worked great. I was able to provide solutions to my client, write from the database schemas, modified and customized to the application needs of course.

enjoy, and avoid reinventing the wheel!

ASP.NET 2.0 and up : RequiredField Validator and DropDownList

Simple: to validate a dropdownlist, the following is required:

1. AppendDataBoundItems="true" (this property allows us to add static items to the databound collection)

2. Have an item that has a value of 0 :

<asp:ListItem Text="Please select an item" Value="0" Selected="true" />


3. Add a required field validator with the property "InitialValue" set to 0.


<asp:RequiredFieldValidator runat="server" id="RequiredDropDown" 
ControlToValidate="DropDownList1" InitialValue="0" ErrorMessage="Please select an Item" />


Here's the complete Code Listing


   1: <asp:DropDownList ID="ddlPhases" runat="server" DataSourceID="sqldatasource1" Width="183px"


   2:     DataTextField="Phase" DataValueField="PhaseID" AppendDataBoundItems="true">


   3:     <asp:ListItem Text="Select a phase" Value="0" />


   4: </asp:DropDownList>


   5:  


   6: <asp:RequiredFieldValidator ID="RequiredFieldValidator1" runat="server" ControlToValidate="ddlPhases"


   7:     Display="Dynamic" InitialValue="0" ErrorMessage="Pleas Select a Phase" />


   8:  


   9: <asp:SqlDataSource ID="sourcePhases" runat="server" ConnectionString="<%$ ConnectionStrings:CnString %>"


  10:     SelectCommand="Select PhaseID, Phase From Phase" />


asp.net: DropDownList and SQLDataSource In a User Control

this is a great way to reduce code in an asp.net form. using a user control, which encapsulates all the functionality of the dropdownlist, including the data binding (sqldatastource or objectdatasource).

here's the sample code for the ascx file:

   1: <%@ Control Language="C#" AutoEventWireup="true" CodeFile="ddlPhaseEnglish.ascx.cs" Inherits="Controls_Lists_ddlPhaseEnglish" %>
   2: <asp:DropDownList ID="ddlPhases" runat="server" DataSourceID="sqldatasource1"
   3:     Width="183px" DataTextField="Phase" DataValueField="PhaseID" AppendDataBoundItems="true">
   4:     <asp:ListItem Text="Select a phase" Value="0" />
   5: </asp:DropDownList>
   6:  
   7: <asp:SqlDataSource ID="sourcePhases" runat="server" ConnectionString="<%$ ConnectionStrings:CnString %>"
   8:     SelectCommand="Select PhaseID, Phase From Phase"></asp:SqlDataSource>
   9:    

until now, it's all normal. what we add to make it the user control a DropDownList is a property to the ascx.cs file of this user control  for the code behind (ascx.cs) file:


   1: public String SelectedValue
   2:     {
   3:         get { return this.ddlPhase.SelectedValue; }
   4:         set { this.ddlPhase.SelectedValue = value; }
   5:     }

This property gives access to the dropdownlist, directly from the user control. Combining all these (the property SelectedValue in the code behind file and the ascx, we can have the following two line to define are dropdownlist:


   1: <%@ Register Src="Controls/Lists/ddlPhase.ascx" TagName="ddlPhase" TagPrefix="uc8" %>
   2:  
   3: <uc8:ddlPhase ID="DdlPhase1" runat="server" />


the above code is a lot cleaner and developer friendly than having the sqldatasource syntax included in every page. This method is just simpler than using a custom control, although the ideal is always a custom control in the bin folder.

Here's a screen shot of what the dropdownlists folder looks like in one of the applications where this technique is applied :


image
I hope this helps. Regards to web developpers